


There are many steps in this process, so I wanted to make a guide to automate your downloads for your Plex Media Server, where all the steps are in one place. Here is a list of what I had lying around and used in setting this up. Yours of course can and will most likely vary from this.
- Orange Pi PC http://www.orangepi.org/orangepipc/.
- Rock64 https://www.pine64.org/devices/single-board-computers/rock64/ You can actually pick up a 1 gb ram version of this board with power supply, 16gb micro-SD and case for only $20 here on Amazon. https://www.amazon.com/gp/product/B0868WSTXH/ref=ppx_yo_dt_b_asin_title_o04_s00?ie=UTF8&psc=1. Be aware that it comes as a Recon Sentinel security device.
- 2 micro-SD cards – I would get at least 16gb.
- SD Card Formatter – https://www.sdcard.org/downloads/formatter/.
- balenaEtcher – https://www.balena.io/etcher/.
- VNC Viewer – https://www.realvnc.com/en/connect/download/viewer/.
- VPN service – I went with this. https://stacksocial.com/sales/ra4w-vpn-lifetime-subscription. It looks to be sold out on that website, but you can google it and find it in other places as well. UPDATE: This linked VPN service seems to only have 3 servers up at this time. You might try FastestVPN at https://stacksocial.com/sales/fastestvpn-lifetime-subscription
- OPENVPN.
- Torrent client.
- Private torrent website (highly recommended but not required).
- PuTTY – a free SSH and telnet client https://www.putty.org/.
- PC, Server or NAS to run Plex on.
- Storage space.
The Steps
One – Set up Plex Media Server
I already had a plex media server in place on a NAS. They are pretty easy to set up, but if you don’t have one already start here https://www.plex.tv/. There are tons of guides if you google it.
Two – Set up the Rock64 with a torrent client and VPN
Install the OS
The next thing would be to install an OS on the Rock64 (or another device) and choose a torrent client. I went with a DietPi os version of Debian Buster because it is a light version. You can go to dietpi.com, click on download and choose the model of single board computer you have and there will be a download button and an instruction button right below it.

I used my pc to put the image on the micro-SD card. First format the micro sd card with SD Card Formatter and then use balenaEtcher to flash the image that was downloaded from DietPi. Plug the micro-SD card into the Rock64 and fire it up. Connect to your router and look at attached devices to find the internal IP address of the device once it is running. Open PuTTY and connect to that IP. Otherwise, you can connect a monitor, keyboard and mouse to set up. The internal IP address will look something like one of these:
- 10.0.0.0/8 IP addresses: 10.0.0.0 – 10.255.255.255
- 172.16.0.0/12 IP addresses: 172.16.0.0 – 172.31.255.255
- 192.168.0.0/16 IP addresses: 192.168.0.0 – 192.168.255.255
Another way to find the Ip address is to open a command prompt and type Arp -a. This will display a list of Ip addresses actively connected to your network. I like the router option better as it usually displays a name that makes it easier to know which device I am looking for.
Desktop with remote access
On this one you will most likely want a desktop environment for ease of use of the torrent client. I chose XFCE because it is lighter on resources as well. So that you do not have to keep a monitor and keyboard connected to the rock64, I recommend setting up a TightVNC server and using the VNC Viewer to remote in. Here is a link to a good guide to install and configure both the XFCE desktop and the TightVNC server. You could feasibly stop after step one, but you would need to use PuTTY to start the VNC server each time you restart it and it would not be as secure. https://www.digitalocean.com/community/tutorials/how-to-install-and-configure-vnc-on-debian-10.
Mapping drives and setting up torrent client
You will want to map a network share of your download location. If you are not sure how to do that, this is a good guide https://wiki.ubuntu.com/MountWindowsSharesPermanently
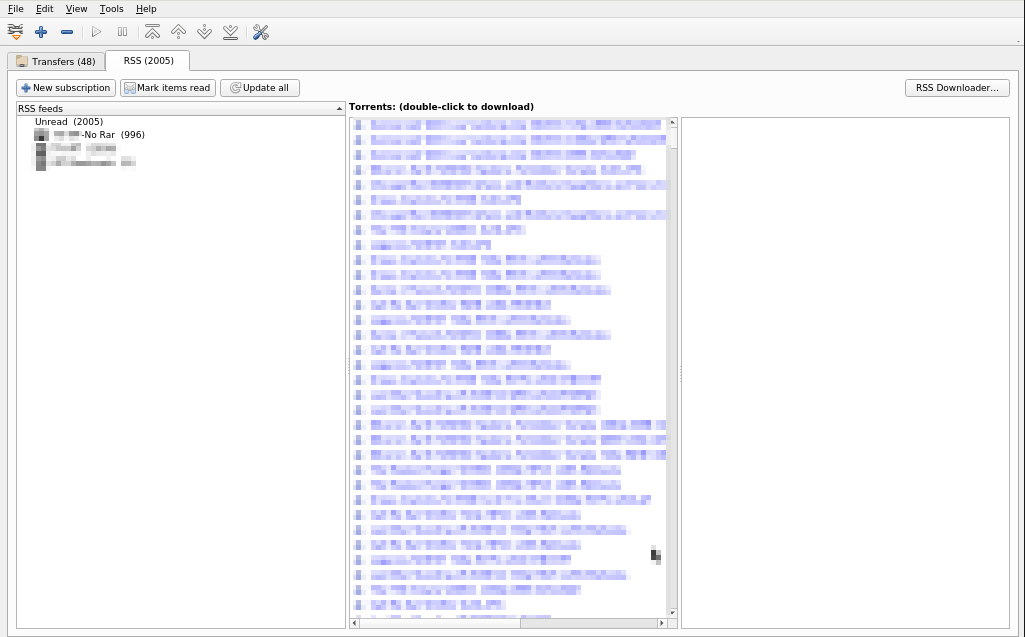
I went with qBittorrent for my torrent client, mostly because I liked the RSS downloader. It allows you to create rules to automatically download when something becomes available. It requires of course having an RSS feed to connect to for that to work. Hopefully you already have a private torrent site you belong to that has RSS feeds. If not the rest of this guide still works. You can get qBitttorrent here https://www.qbittorrent.org/download.php. Alternatively, the easiest way is to open a terminal on your DietPi OS and type in the following:
sudo apt install qbittorrent
You may be missing some requirements, but you can see those after running this and you may need to google how to install those and re-run the code above.
If you are using a private torrent site, and I hope you are, you need to configure your preferences according to their recommendations. This is out of scope of this guide. I will say that one thing you will need to do is enable Web User Interface (Remote Control) under Tools > Preferences > Web UI. Set a Username and Password. This will be used later in the automation.
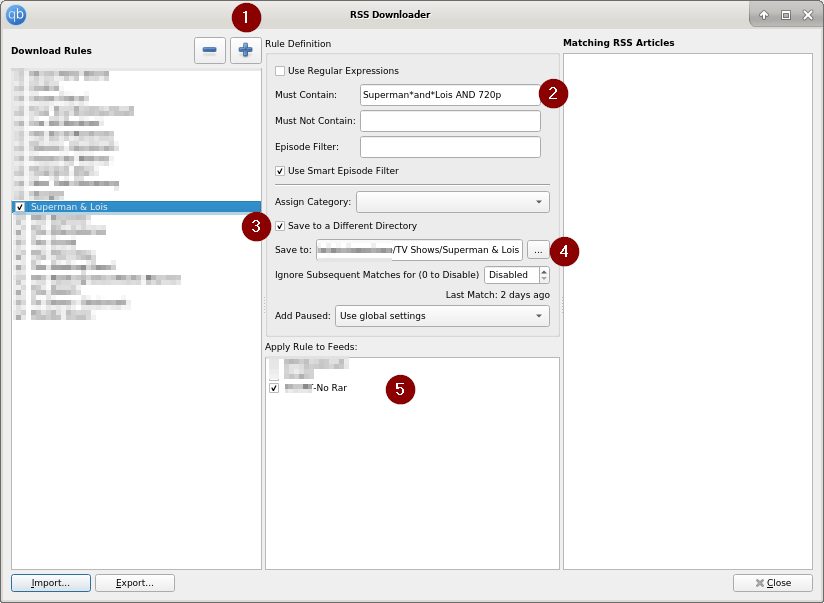
Once you set up the RSS feed/s from your torrent site I highly recommend using the RSS Downloader. This will be the most fully automated process that you can do for TV shows (UPDATE: When I originally wrote this article, I was not fully aware of how Ombi worked. This can be fully automated as well using Ombi and associated tools. No need to use the RSS downloader, unless you just wanted to. Ooops). Set it and forget it basically. I will make one example of this to show you how it is done. You will need to go to the RSS tab (if you do not see this go to the Tools > Preferences > RSS and enable fetching RSS feeds) and add a new subscription. This is a URL given to you by your torrent site. Next click on RSS Downloader on the right side. Click the + button to add a new download rule and give it the name of the show. Under “Must Contain” you will put what you are looking for in the torrent. In this example it is Superman and Lois at 720p. Choose the save to a different directory and navigate to the mapped network share you made earlier. Choose the rule you want to use from the RSS subscriptions you made earlier. Once it becomes available it will automatically download to the directory you chose.
VPN Set Up
Lastly for this step, you want to set up and configure your VPN. With Ra4w vpn, they provide you with configuration files for each vpn server that you can connect to. The way I will show will automatically connect on start up to the vpn, so you will always be connected unless the vpn went down or you stopped it. Install openvpn by opening a terminal and running the following command
sudo apt-get install openvpn
Once that is finished you can navigate to /etc/openvpn. This is where you will place the Ra4w vpn config files. You will need to change the extension of the config file from .ovpn to .conf. Edit the file on about line 10 to add “auth.txt” after auth-user-pass. End result of that line will be:
auth-user-pass auth.txt
Also, at the very bottom of that .conf file you need to add the following to handle the dns implementation.
script-security 2
up /etc/openvpn/update-resolv-conf
down /etc/openvpn/update-resolv-conf
In the path of /etc/openvpn create a new text file called auth.txt. In this file you will have 2 lines. The first line will be your vpn username and the next line will be your vpn password. (These are not the same as your login credentials for the website)
You are now finished with step two and this device.
Three – Orange PI Pc (or not) to house Jackett, Radarr, Sonarr and Ombi.
On the Orange Pi Pc I decided to go headless (no gui) and I chose the Armbian Buster OS that you can find here https://www.armbian.com/orange-pi-pc/. There will be no need to install TightVNC on this server since it is headless. Just use PuTTY to connect to it. Again you will find your ip address as mentioned in step two.
Map the network share from step two on this device as well.
Installing Ombi
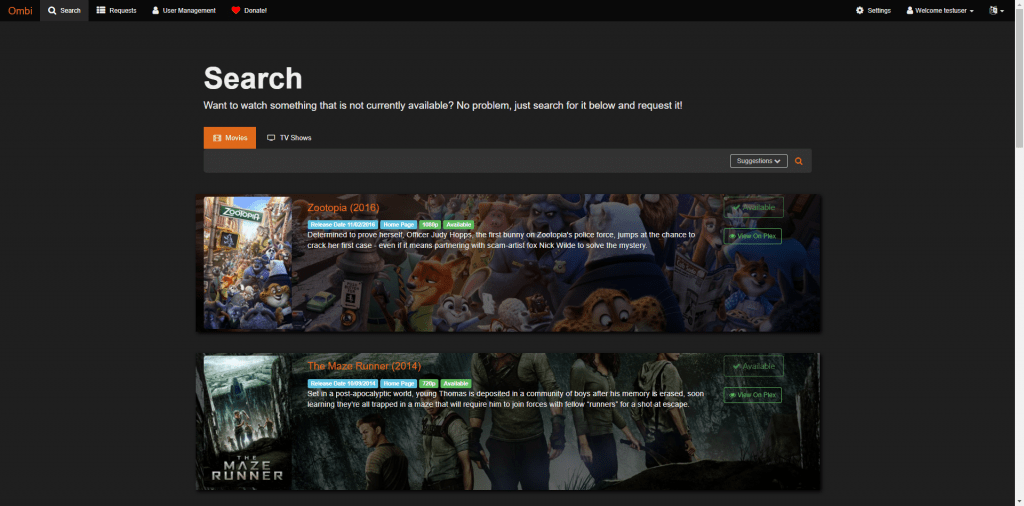
This is the web interface that you and others can use to request movies or tv shows. You can then approve the request or set it to auto approve. Once approved it uses Sonarr or Radarr and Jackett to cause your torrent client to download it. Once the download has completed and been marked as available, the user that requested gets a notice that it is available. Only users you have added as a friend and shared with will be able to use Ombi and watch the downloaded show. Don’t forget to import those users into Ombi from Plex (later step).
- Add the apt repository to the sources list
echo “deb [arch=amd64,armhf,arm64] http://repo.ombi.turd.me/stable/ jessie main” | sudo tee “/etc/apt/sources.list.d/ombi.list”
- This is a signed repo; add the Ombi key for validation
wget -qO – https://repo.ombi.turd.me/pubkey.txt | sudo apt-key add –
- Update and install Ombi
sudo apt update && sudo apt install ombi
If successful you should now be able to reach Ombi at http://<your-ip-address>:5000, where <your-ip-address> is your internal ip for your Orange Pi PC (or whatever you used)
Installing Radarr
Radarr will work with Ombi to automate your downloads for movies. You may need to run the following with sudo depending on user
- Install pre-requisites
apt install apt-transport-https dirmngr gnupg ca-certificates curl mediainfo
- Get the Mono repo keys
apt-key adv –keyserver hkp://keyserver.ubuntu.com:80 –recv-keys 3FA7E0328081BFF6A14DA29AA6A19B38D3D831EF
- Add the repo
echo “deb https://download.mono-project.com/repo/debian stable-buster main” | tee /etc/apt/sources.list.d/mono-official-stable.list
- Update
apt update
- Install Mono
apt install mono-devel
- Create new user (where radarr radarr is the username and group name. Change as desired or just use this. Group and user are usually the same)(Make sure this user can access the network share you mapped)
useradd radarr radarr
- Change directory to tmp
cd /tmp/
- Go to Radarr downloads at https://github.com/Radarr/Radarr/releases and look for the latest stable release. At the time of writing this it is “Radarr.master.3.0.2.4552.linux.tar.gz”. Right click it and copy the link address and replace it in the following if different from mine.
wget https://github.com/Radarr/Radarr/releases/download/v3.0.2.4552/Radarr.master.3.0.2.4552.linux.tar.gz
- Extract to /opt/
tar -xf Radarr* -C /opt/
- Give ownership of the Radarr installation to the user you created
chown -R radarr:radarr /opt/Radarr
- Start Radarr at boot. Create a systemd service file for the radarr daemon. Type nano /etc/systemd/system/radarr.service and add the following where user and group are what you created.
[Unit]
Description=Radarr Daemon
After=syslog.target network.target
[Service]
User=radarr
Group=radarr
Type=simple
ExecStart=/usr/bin/mono /opt/Radarr/Radarr.exe -nobrowser
TimeoutStopSec=20
KillMode=process
Restart=on-failure
[Install]
WantedBy=multi-user.target
- Enable Radarr at boot
systemctl enable radarr.service
- Launch Radarr
systemctl start radarr.service
You should now be able to reach Radarr at http://<your-ip-address>:7878, where <your-ip-address> is your local ip for the orange pi or other device.
Installing Sonarr
Sonarr will connect to your ombi for automation of downloads for tv shows. I had issues here because I used the instructions on Sonarr website but failed to pay attention to the big yellow warning about choosing your user carefully. I ended up having to remove the files and it was a pain to make sure I got rid of them. There was an option to use debconf to reconfigure the user, but it did not seem to work for me until I logged in as the user I decided to use and run the install again. So, my suggestion here is to try and create the user first and then log in as that user to install. Another option would be to just log in as the user you created for Radarr and use that user. You might need to give that user sudo privileges like below where username is the name of the user you created. You will have to be logged in as root or as another user with sudo.
- Give user sudo and log in as that user or log in as the user you want to use.
usermod -aG sudo username
- If you have Debian 10 use the following 3 steps. If you have another version of debian then just change buster with either stretch or jessie.
sudo apt-key adv –keyserver hkp://keyserver.ubuntu.com:80 –recv-keys 2009837CBFFD68F45BC180471F4F90DE2A9B4BF8
echo “deb https://apt.sonarr.tv/debian buster main” | sudo tee /etc/apt/sources.list.d/sonarr.list
sudo apt update
- Install Sonarr
sudo apt install sonarr
If you have issues you can try to run the following to correct it.
dpkg-reconfigure sonarr
You should now be able to reach Sonarr by going to http://<your-ip-address>:8989, where <your-ip-address> is your local ip for the device you are on.
Installing Jackett
You will use Jackett to create a custom Torznab in Radarr and Sonarr. This will be your connection to your private torrent to get your downloads.
- Install the following to open the Jackett compiled binary. Mono is required for some private trackers.
sudo apt-get update
sudo apt-get install libcurl4-openssl-dev bzip2 mono-devel -y
- Change directory
cd /tmp/
- Download the latest Jackett release
jackettver=$(wget -q https://github.com/Jackett/Jackett/releases/latest -O – | grep -E \/tag\/ | awk -F “[><]” ‘{print $3}’)
wget -q https://github.com/Jackett/Jackett/releases/download/$jackettver/Jackett.Binaries.Mono.tar.gz
- Unpack to /opt/
tar -xf Jackett* -C /opt/
- Change ownership
sudo chown -R radarr:radarr /opt/jackett
- Test running Jackett
mono /opt/jackett/JackettConsole.exe
Kill the process by Ctrl + C. If it did not start and run correctly you may need to start over, which would require removing the files you previously added.
- Create systemd service for autostart by doing the following in the terminal
nano /etc/systemd/system/jackett.service
Then add this to it.
[Unit]
Description=Jackett Daemon
After=network.target
[Service]
User=radarr
Restart=always
RestartSec=5
Type=simple
ExecStart=/usr/bin/mono –debug /opt/jackett/JackettConsole.exe –NoRestart
TimeoutStopSec=20
[Install]
WantedBy=multi-user.target
- Enable jackett
sudo systemctl enable jackett
You should now be able to reach Jackett by going to http://<your-ip-address>:9117, where <your-ip-address> is the local ip for your device.
Bringing it all together to automate your Plex Media Server content
I will not be going into a lot of detail for all the settings as these are mostly preferential. I will go over the basics of making it all connect and work. Let’s start with Ombi
Configure Ombi to automate your downloads for your Plex Media Server
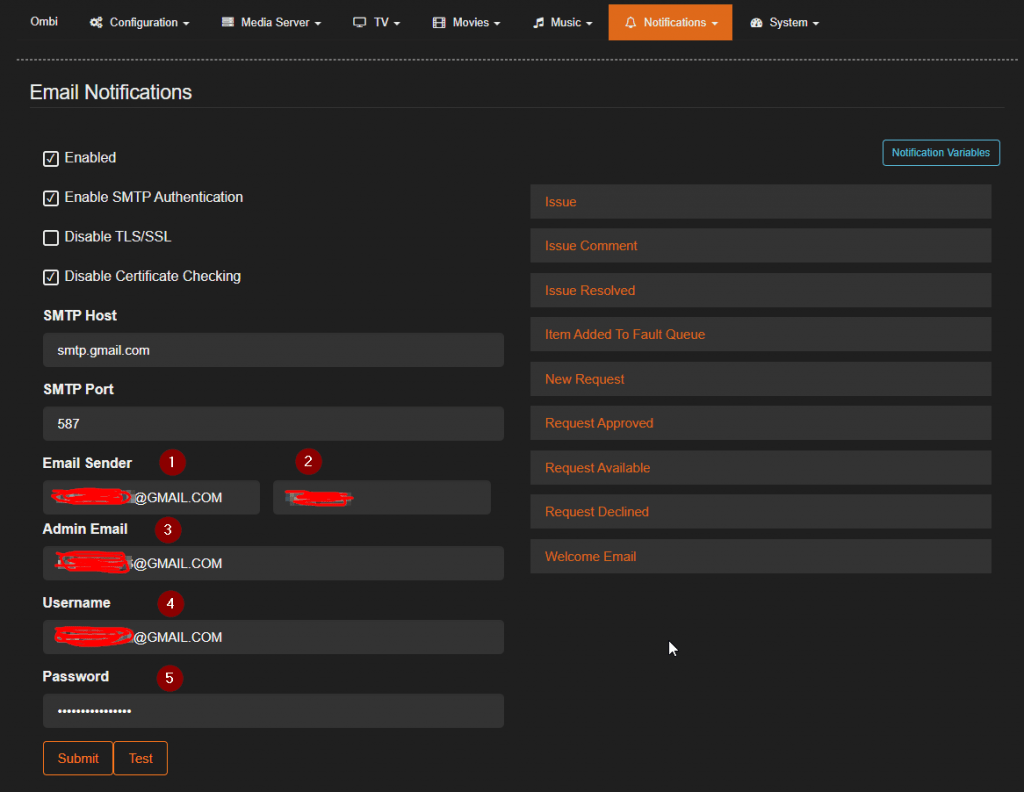
For the mail there are many ways to do this including having your own mail server. This is how notifications are sent out by Ombi. I opted for using Gmail. If you use Gmail you will have to go to Manage your google account. On the left side click on Security then look for app passwords and click on it then select app > custom. Name the app Ombi or whatever you like. You will get a password to copy and enter into Ombi. To enter your mail settings, go to Notifications > Email. You can use your Gmail account for the email sender, admin email and username and use the settings you see below. Enter the password you copied for the password. Click on submit and then test.
Go to Media Server > Plex to enable and connect your Plex Media Server to Ombi. Run the manual sync so that Ombi will know if you already have the movie/show in your Plex
Go to Settings > Configuration > Authentication and enable Plex oauth
Go to Settings > Configuration > Importer to import users from your plex. This will allow them to use Ombi by signing in with their plex account. You will choose what they can do on this screen.
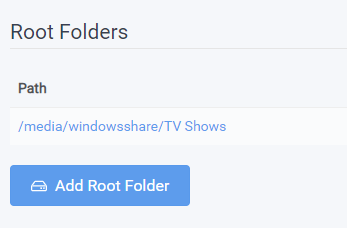
You will need to go to Sonarr and map the root folders if you have not yet. This is the network share you mapped previously. Go to Settings > Media Management and at the bottom of the screen look for Root Folders, click on Add Root Folder button and navigate to the correct path. Example below.
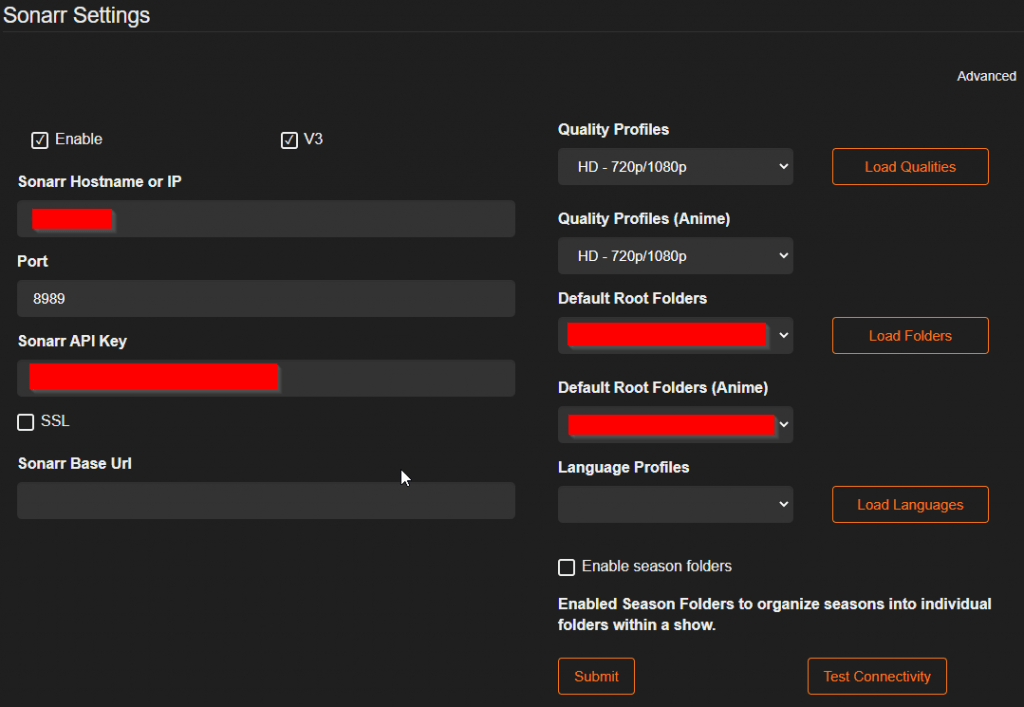
Go to Settings > TV > Sonarr and enter the local ip and port 8989. Open Sonarr and go to Settings > General and copy the API key and enter it in the Sonarr API Key like below. You can then click on each of the load buttons on the right and choose your preferences. Submit and test connectivity.
Next up is Movies > Radarr and do the same steps as you did above for Sonarr.
Once that has been completed, we will move on to Jackett. You will need to create an indexer that you can add to Sonarr and Radarr. The easiest way for me was to grab the cookies from the torrent site while logged in. Here are some instructions on how to do that if you are not sure. https://github.com/Jackett/Jackett/wiki/Finding-cookies.
Next you will click on indexer and choose your torrent provider. This will open that website and then you can grab your cookies and enter it. That is it for Jackett.
Now to finish up the configuration for Radarr and Sonarr. These steps are the same for both so I will just be doing one, but know that you need to repeat these steps on the other. In Sonarr go to Settings > Indexers > Add > Torznab > Custom.

Go back to Jackett and on your indexer, you created, click on copy torznab feed. Navigate back to your Sonarr tab and Name your Indexer, paste the Torznab you just copied from Jackett into the url field. Now go back to Jackett once more and copy the API key at the top. Paste that into the API Key in Sonarr. Double check your settings and save and test.
The last important step is to add the download client. Go to Settings > Download Client and click the + sign. Choose qBittorrent and give it a name, add the host (local ip address of the Step Two device above) and use the default port 8080 unless you changed it in your client to something else. Enter the username and password you created for qBittorent.
Go through the rest of the settings to adjust things to your preference and that is it for Sonarr.
Repeat this process for Radarr and you are done. You can now go to Ombi and request a movie/show. If you are an admin the movie/show will automatically download, otherwise the request will be sent to you for approval and then the download will begin. When it is complete you can mark it available, and the requester will be notified that is it available.
TitleFinal Thoughts on automating your downloads for your Plex Media Server
I wrote this up mostly from memory, so the details are lacking at times as there was some trial and error. I think it is enough to get you in the right direction. If something is missing google will surely know or you can comment below, and I will do my best to help out.
Please check out other articles on https://notposted.com
No Comments on "Guide to automate your downloads for Plex Media Server"