

This tutorial will demonstrate how to use a seed box to increase your ratio. Often, new members will mess up their ratio right off the bat by not seeding to required amounts or time. Or they may decide to redo their setup and unwittingly remove the torrents and have to download them again, etc., etc. For most normal users your only option is to try to snag only Freeleech for torrents that just released within minutes of release. This is time consuming and sometimes hit or miss especially when doing on your own hardware as you will have slower connections or be throttled etc. The method below will use a seed box and be automated.
Initial results
After 12 hours of running this setup, I have increased the ratio from 1.222 to 1.332. That may not seem like a lot but under normal use it would barely move the needle.
The requirements
I knew I wanted to use a seed box to increase my ratio. I knew that the most important thing would be having unlimited traffic so that I could make the most of increasing the ratio. The seed box would need the applications Jackett or Prowlarr, qBittorrent and Autobrr. And since this was all for testing and trial just for this article, I wanted it to be as inexpensive as possible. I am assuming that unlimited will probably have some restrictions, so I wanted to set it up in a way that I was not abusing that perk. My attempt at that will be seen in the set up later in the article. We will also need PuTTY and FileZilla installed on our local computer. These are free downloads.
The Choice
The seedbox that fit the requirements best, at the time of writing this article, was FeralHosting at https://www.feralhosting.com/pricing. I went with the Helium plan for 10 Pounds per month or $12.53. This included unlimited traffic, a shared 20Gbit/s and 1TB of storage. I am sure many will think 1 TB is not sufficient, but we are structuring this in a way that we will have seeded it way past the required amount for as long as we can. The pro on this choice is the price and unlimited traffic. The con is that they lack a polished user console with one-click app install like some others have. Which means each of the apps requires installation from the command line. Don’t worry as it really is copy and paste and there are only 3 applications to install to make this work. All of these are on their website, but I will be putting them in this tutorial as well.
Let’s get started
Account Setup
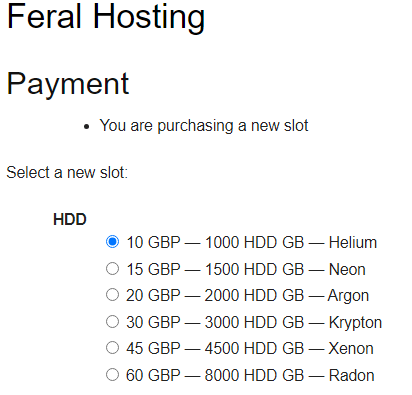
You will need to create an account by registering an email at Login – Feral Hosting. Enter an email and click on register. On the next screen enter a username you desire to use. You will be emailed a password. Go back to Login – Feral Hosting and enter your email and password and click on the login button. You will now be at the screen where you have to place your order. The plan I chose is Helium:
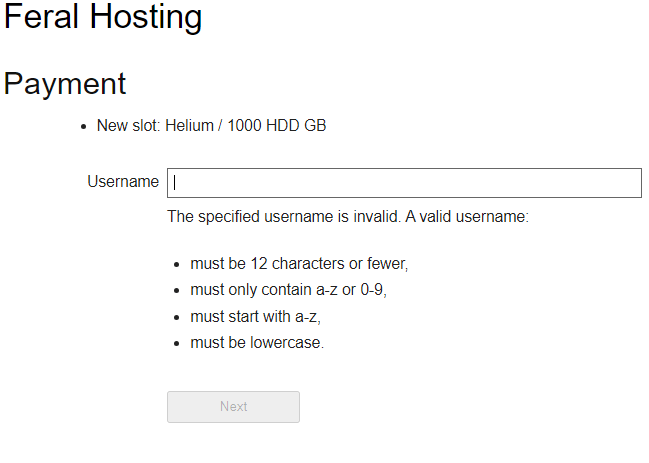
Create a username:
Choose if you want a one-off payment or a recurring payment:

Your choices for payment are debit, credit, pre-paid using stripe or bitcoin. If you are using a chrome browser you will also have the option for google pay if you have that set up.
PuTTY
You will get an email that your slot is available once it has been set up. In the email you will see the username@servername. Click on that and you will be on your main page. The url will look something like this in your browser: https://www.feralhosting.com/slots/servername/username. I recommend that you go ahead and bookmark this page.
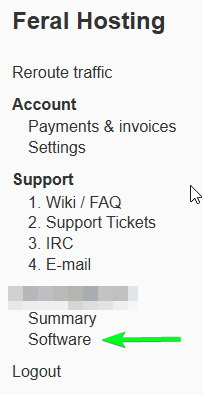
Click on the word Software and you will see a page that shows your SSH, SFTP and FTP Access which includes your server name, username and password. Now open the PuTTY application on your local computer and enter the servername and port 22 like in the image, except replace servername with your actual server name.
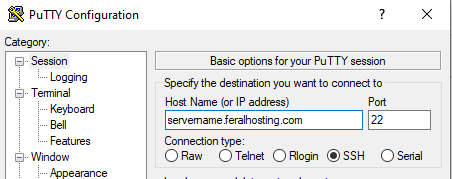
Click on the open button at the bottom and you will have a black cmd window open asking for your username. Enter that and then it will ask for your password. You will see an ascii drawing of the name Feralhosting.com on the screen and you will know you are logged into your server.
Install and set up qBittorrent
In your PuTTY client enter the following and then press the enter key on your keyboard:
wget -qO ~/install.qbittorrent.sh https://bitbucket.org/feralio/wiki/raw/HEAD/src/wiki/software/qbittorrent/install && bash ~/install.qbittorrent.sh
It will provide you with the url to reach qBittorrent, but it will take about 5 minutes to complete the install, so be patient. Your url will look similar to this https://servername.feralhosting.com/username/qbittorrent/ where the servername is your servername and the username is your username. Also, this is a good time to bookmark it as well.
You will find the above command to install as well as others for starting, stopping etc. in your manager under support > Wiki/FAQ > Available software > qBittorrents. This applies to each of the following as well.
Some of the main settings to change is to disable DHT, Pex and Peer discovery under the BitTorrent tab under options.
Install and setup Jackett
Copy and then paste the following line into your PuTTY client and then press enter on your keyboard:
wget -qO ~/install.jackett.sh https://bitbucket.org/feralio/wiki/raw/HEAD/src/wiki/software/jackett/jackett.sh && bash ~/install.jackett.sh
Your url to access Jackett will be similar to this: https://servername.feralhosting.com/username/jackett/UI/Dashboard where you replace servername and username with yours. You will need to add an indexer at the top of the Jacket screen and choose your source. You should have this info or know how to get it. Some require you to snag the cookies from your site and add it. If they do, it will be similar to this article: https://github.com/Jackett/Jackett/wiki/Finding-cookies. Once you have set it up, make sure when you hit the test button it comes back with a green checkmark.
Install and setup Autobrr
Copy and then paste the following line into your PuTTY client and then press enter on your keyboard:
wget -qO ~/install.autobrr.sh https://bitbucket.org/feralio/wiki/raw/HEAD/src/wiki/software/autobrr/autobrr.sh && bash ~/install.autobrr.sh
It will ask you to create a password to access it. Your url to access Autobrr will be similar to this: https://servername.feralhosting.com/username/autobrr/ where you replace servername and username with yours. Once you access autobrr you will need to do the following. Go to settings > Indexers > Add New. In the dropdown box, choose your provider and fill in the rest of the fields you need like possibly a passkey. You may have to reach out to your provider for this info but normally can be found in your account area. You will need to add a nick for the IRC. Normally this will be your username_bot or username_autodl, etc.
Now under settings > IRC you should see that it automatically added this for you. You may have to enable it. If it did not you will have to manually create it and this info you would get from your provider.
Go to settings > Client > Add New, give it a name like qBittorrent and select the qBittorrent radial button. Copy and paste the url to qBittorent in the host that will look like https://servername.feralhosting.com/username/qbittorrent/, enable TLS and enter your username and password for qBittorrent. Set your active max downloads to 5 here. This is part of keeping from abusing the perk of unlimited traffic. Test and if successful create it. Make sure it is enabled on the main IRC tab.
Let’s check the logs setting by going to settings > Logs. To begin we want to set them to debug in the dropdown. This is so we can get a little more info when we are testing out our set up. Later when everything looks good we can change it to info.
The final step for Autobrr is the filter. Go to filters and Create Filter. Give it any name you wish to identify it with. On the general tab under Indexers we are going to select the only indexer we have made so far and it will show up as all are selected. Under max size I put 10GB. These are the only things to modify on the general tab.

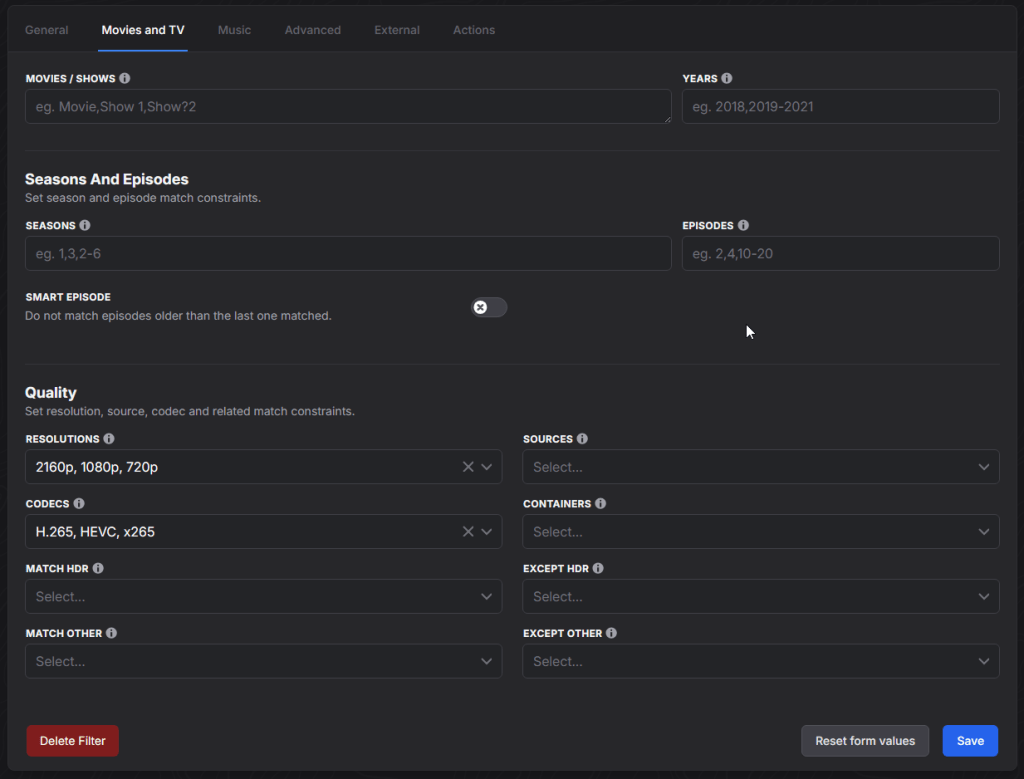
Select the Movies and Tv tab. The image below shows the only changes I made here. Again, I only chose two things concerning quality and codecs. I did not want to choose them all so as to not grab everything to have some mercy on the unlimited traffic.
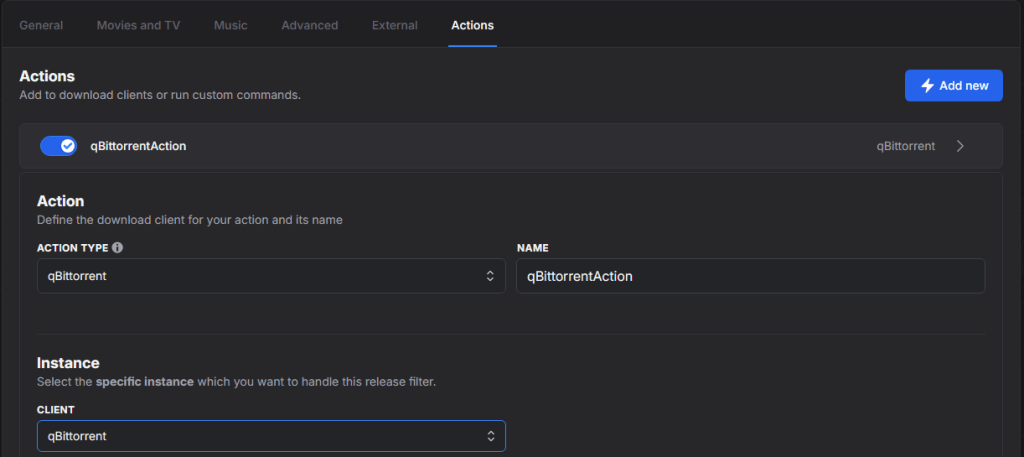
I made no changes on the Music, Advanced or External tabs. In the Action tab click on Add New and choose qBittorrent under action type, give it a name, I chose qBittorrentAction and then choose qBittorrent under instance client. Make sure the filter we just created is enabled on the main filter page.
That’s it! As long as everything was set up right, we should start grabbing files. Check the logs for any messages in Autobrr. This might help you find out where there is an issue if it is not working. Keep in mind there has to be a release in IRC for it to snag it.
Super Low Ratio’s
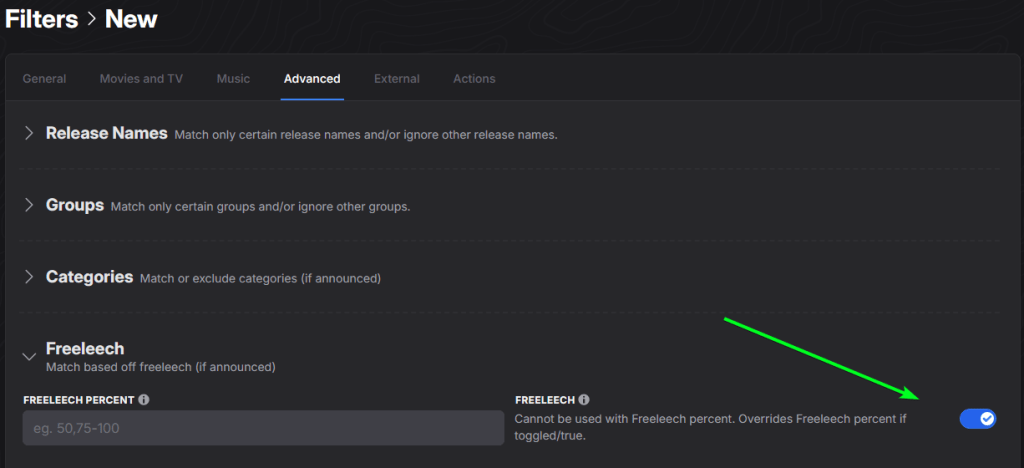
If your ratio is already dangerously low, then I would suggest a slightly different approach. If you have the option to donate to help, then do that first as it will give you some wiggle room. I would only snag Freeleech as this does not add to your download but will give you upload credit. The first step is to go to the General tab and clear out the Max size so that it defaults to all sizes (if you have a really small space to work with you can set a size limit). Then on the Movies and Tv tab, change the resolution and codecs to select all. Finally, click on the advanced tab and open the freeleech section and enable freeleech. You will now be snagging freeleech only, which should help to raise your ratio. Keep in mind there are fewer freeleech and usually can be large in size. But anything you upload will be beneficial to your ratio without potentially harming it with download. Once you get your ratio up you can go back to download other torrents if you wish. I found that 40GB was a good limit for the 1 TB storage plan.
Filezilla
If you plan to download some of these to your local storage you will need Filezilla. It is a free download so just search for it. Once you have it installed you will use the same credentials you used for your PuTTY. To find out where your files are at on their server, go to qBittorrent and click on options > downloads and you will see the path there. Simply drag and drop to where you want it on your computer or network.
More about Feral Hosting
I also installed Plex on Feral as well. I was pleasantly surprised at the responsiveness of playing something that was hosted in the Netherlands. I half expected some buffering but there was none. For the price, even if you just purchased one month, it would pay for itself in getting your ratio back up. They have a good selection of applications you can install that could automate your process from beginning to end if you wanted to use it for more than just the use case I have shared here today. For example, you can install Ombi, Sonarr and Radarr as well and instead of pulling all shows from IRC you can just request what you want through Ombi and have Sonarr and Radarr leverage Jackett to snag specifically the codec, container and quality types of what you want. I tried the SFTP using FileZilla and I must say it was pretty slow at 8.5 Mib/s at best. I may need to make some adjustments here. I will say here that I also tried out Ultra.cc and it is for sure has a more polished control panel and the ease of 1 click app installs. The performance was good as well, but no unlimited traffic.
Final Thoughts
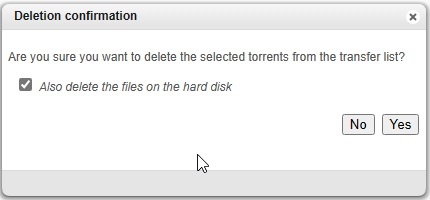
To build on what I mentioned earlier, the reason the storage space is not as much of an issue, is because as we get close to running out, we will sort the torrents in qBittorrents by size. Then select multiples of the largest files, right click and delete or remove and make sure to check the delete the files on the hard disk and click yes.
I would only recommend using the seed box to increase your ratio in this manner until you fix your ratio. After that, just use it as normal. You might find you enjoy it enough to add more storage or change to another plan or even another provider. I put together what I think is a great solution using a docker compose yaml file with all of the applications one needs, to include a vpn on a per application level if desired and it can run on an old desktop. You can find that solution here: https://notposted.com/all-in-one-media-docker-container/ But I have at least this month to play around with this seed box to get a feel for it as well.
Please comment below if you have suggestions or questions.
Find more at https://notposted.com
No Comments on "Tutorial on using a seed box to increase your ratio"