Welcome to your first step into the world of Excel! Whether you’re looking to manage your household budget, organize business data, or just crunch some numbers, Excel is a powerful tool that can help. This lesson is designed to gently introduce you to the Excel interface and basic terminology. By the end, you’ll be more familiar with Excel and ready to start exploring on your own. Let’s dive in!
Understanding the Excel Interface
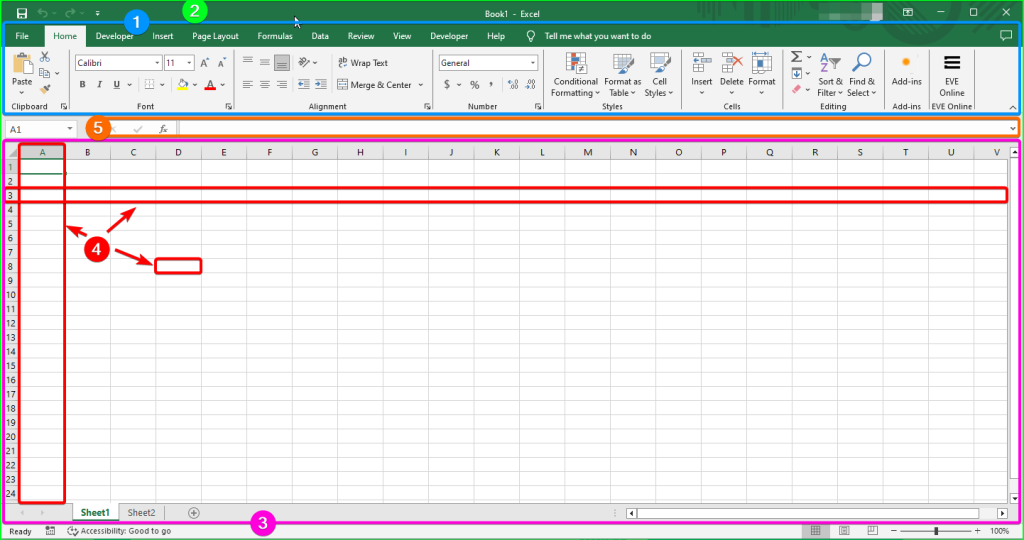
When you open Excel, you’re greeted with the Start Screen, where you can choose to open a new workbook or an existing one. Once you select a new workbook, you enter the main Excel interface, which consists of several key components:
- 1 – Ribbon: This is the strip at the top of the workbook that contains multiple tabs (like Home, Insert, and Data). Each tab includes a group of related tools and features.
- 2 – Workbook: An Excel file is called a workbook, which can contain one or more worksheets.
- 3 – Worksheet: A single sheet within a workbook where you input and organize your data. You can switch between worksheets using the tabs at the bottom.
- 4 – Cells, Columns, and Rows: The grid of a worksheet is made up of cells, where your data lives. Each cell is defined by a column letter (A, B, C, etc.) and a row number (1, 2, 3, etc.).
- 5 – Formula Bar: Located above the worksheet, this area displays the content or formula within the active cell.

Basic Terminology
- Cell: The basic unit for storing data in Excel, identified by the intersection of a column and a row (e.g., A1, B3).
- Range: A selection of two or more cells (e.g., A1:A5 denotes a range of cells from A1 to A5).
- Workbook: The entire Excel file containing all your worksheets.
- Worksheet: An individual “page” within a workbook where you work with your data.
Navigating in Excel
- Moving around: You can navigate through cells using your keyboard arrows or by clicking on a specific cell with your mouse.
- Selecting cells: Click on a cell to select it. For a range, click and drag from the start cell to the end cell. You can also select non-adjacent cells by holding down the
Ctrlkey while clicking. - Zooming: Use the zoom slider in the bottom-right corner of the Excel window to adjust the view size of your worksheet.
Practice Exercise
- Open Excel and start a new workbook.
- Explore the Ribbon: Click on each tab in the ribbon and hover over icons to see what they do.
- Navigate: Use your arrow keys to move up, down, left, and right across cells. Try using the
Ctrl+ arrow key to jump to the edge of the data range. - Select Cells: Try selecting a single cell, then a range of cells, and finally, multiple non-adjacent cells using the
Ctrlkey. - Zoom: Adjust the zoom level to see how it affects your view of the worksheet.
Final Thoughts
Congratulations on completing your first Excel lesson! You’re now familiar with the basic layout and navigation of Excel, setting a strong foundation for the exciting journey ahead. In our next lesson, we’ll dive into basic data entry and formatting, where you’ll learn how to input and beautify your data efficiently. Stay tuned!
Remember, practice makes perfect. So, don’t hesitate to explore and experiment with what you’ve learned today. Excel is a vast tool, and getting comfortable with its interface is the first step to mastering it.


No Comments on "Lesson 1: Introduction to Excel"